

-
Products
-
2D Cutting

-
Tube Cutting
-
3D Cutting
-
BLT Intelligent Cutting
-
Industrial Software
-
-
Portfolio
-
-
2D Cutting Head
Tube Cutting Head
Plane Bevel Cutting Head
Structural Steel Cutting Head
-
Popular products
-
- Online Store
- Service & Support
- About BOCHU
- Investors Relations


- Software Download
- Manual
- Video
- Tutorial
Intersect Hole
By default, a hole added on the tube, will be cut with the cutting head perpendicular to the tube surface, and the section will not be vertical. So if you want a hole with vertical section(B axis doesn’t rotate during the cutting), it is necessary for you to add Intersect Hole process.
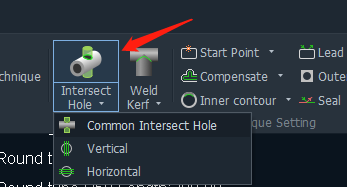
In TubesT, Click Intersect Hole to add this process for selected graphics.
Besides, you can also choose Vertical Intersect Hole and Horizontal Intersect Hole for the holes on the chamfer.
When Vertical Intersect Hole is applied on a hole, then cutting head will cut it directly and B axis doesn’t rotate during this whole process; When Horizontal Intersect Hole applied, B axis will rotate 90 degrees first, then the cutting head will start processing without B axis rotation any more.
With this process added, the holes can be processed precisely with a relative vertical section, and the graphics will also have some difference in the render display. To specify it, you can click Display 3D Vector here to get a distinct effect.
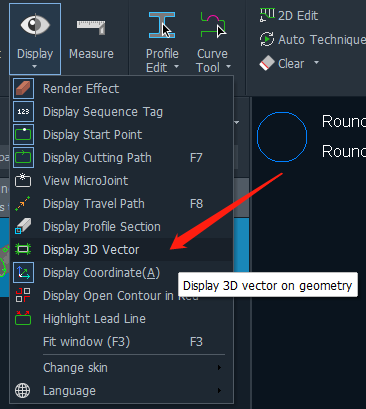
The below shows the difference between the cutting effects with this very process or not.

Intersect Hole
By default, a hole added on the tube, will be cut with the cutting head perpendicular to the tube surface, and the section will not be vertical. So if you want a hole with vertical section(B axis doesn’t rotate during the cutting), it is necessary for you to add Intersect Hole process.
In TubesT, Click Intersect Hole to add this process for selected graphics.
Besides, you can also choose Vertical Intersect Hole and Horizontal Intersect Hole for the holes on the chamfer.
When Vertical Intersect Hole is applied on a hole, then cutting head will cut it directly and B axis doesn’t rotate during this whole process; When Horizontal Intersect Hole applied, B axis will rotate 90 degrees first, then the cutting head will start processing without B axis rotation any more.
With this process added, the holes can be processed precisely with a relative vertical section, and the graphics will also have some difference in the render display. To specify it, you can click Display 3D Vector here to get a distinct effect.
The below shows the difference between the cutting effects with this very process or not.
-

Download
-

Contact us
-

Online consultation

