

-
Products
-
2D Cutting

-
Tube Cutting
-
3D Cutting
-
BLT Intelligent Cutting
-
Industrial Software
-
-
Portfolio
-
-
2D Cutting Head
Tube Cutting Head
Plane Bevel Cutting Head
Structural Steel Cutting Head
-
Popular products
-
- Online Store
- Service & Support
- About BOCHU
- Investors Relations


- Software Download
- Manual
- Video
- Tutorial
Description
Auto Nest plays a dramatically important role in TubesT, there are many advanced functions and options in it so that TubesT can realize various nesting demands from different users, and next we’ll talk about it in detail.

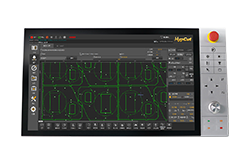
The above is the whole interface of Auto Nest, and also the icon pointed by red arrow.
Parameters definition
- Parts Selection
As shown in the picture, there are two options under this setting, named Nest All Parts and Nest Selected Parts respectively. Just as what its name said, Auto Nest will be applied for all the parts or the ones selected.
You can select the parts by clicking the checkbox beside the parts here.

- Tube Length
Here you can input some basic information for the Tubes, on which you can nest the parts.
- Dead Zone
When the front chuck moves next to mid chuck, the distance from the tail( the nearest side of the front chuck to the cutting head) to cutting head is Dead Zone, called remnant length, which cannot be used during the working actually.
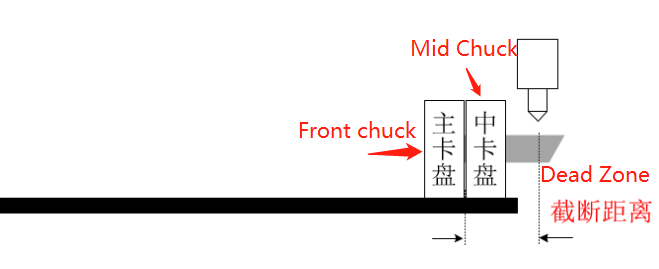
If a tube cutting machine with two chucks, and the front chuck moves to the extremity position as shown above, and there is a distance of 230mm which cannot be processed anymore, then the Dead Zone is 230.
If a tube cutting machine with three chucks, and it has Pull Tubes and Dodge functions to minimize the remnant to 0, then the Dead Zone is 0.
- Remnants
If there are some relative long remnant tubes which can be used to nest the parts again, you can click the checkbox as shown below, then TubesT will nest parts on the remnant tubes first.

- Front Margin
The distance between the first part and tube apex.
Part Gap: the minimum interval between the parts nested when Common Line is not applied.
Actual tube length used to nest the parts depends on Tube length, Dean Zone and Front Margin.
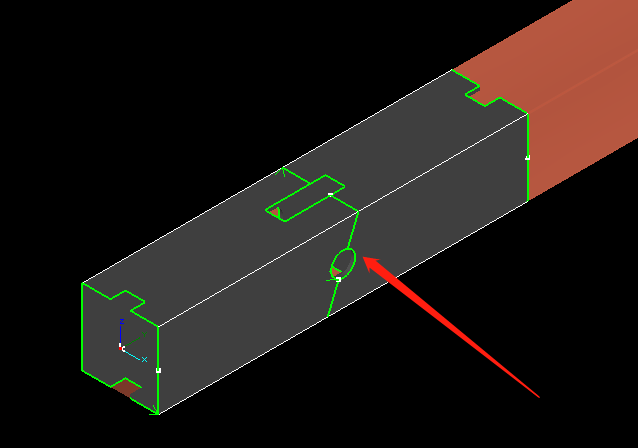
- Disable Y Rotate
If you enable this option, TubesT will not allow the parts to rotate around Y axis, the result is shown as below:

- Disable Z Rotate
If you enable this option, TubesT will not allow Z axis to rotate when nesting.
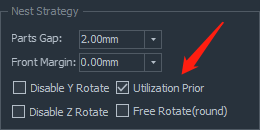
- Free Rotate(round)
If you’re nesting the parts on circular tubes, then the parts can be rotated freely to save more spaces when this option is enabled.
- Identical Match
It is a kind of Common Line types, used for the nesting of general parts, which means the cut-off lines of two adjacent parts are superimposed.

- Weld Kerf Offset
A kind of Common Line types, used for the parts with bevel cut-off section which are applied Weld Kerf process in TubesT.

- Island Type
If there are remnants between the cut-off lines of two adjacent parts, you can apply Island Type to generate the common lines.
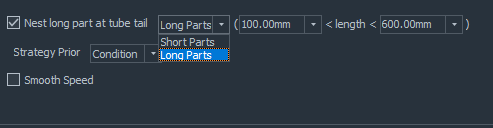
- Nest Long Parts at Tube Tail
For the machines with Dodge and Pull Tubes to realize short or zero remnants, it is necessary to nest long parts at tube tail.
You’re allowed to set a specific length range for Long Parts, then TubesT will nest the parts same to or longer than that value at tube tails during Auto Nest.

Note: You must enable Utilization Prior first before setting length range for parts.
After setting the length range, it is necessary for you to select Strategy Prior, Condition and Economical respectively, in which the former means TubesT will meet the condition first and ignore the utilization, but the latter will put utilization in the first priority.
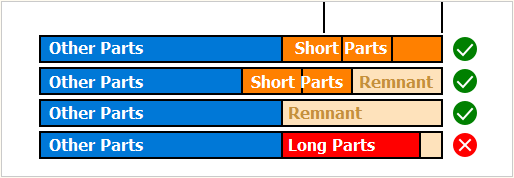
For example, there are some parts to be nested, now the condition is Nest Long Parts at Tube Tails.
If Utilization Prior enabled only, the nesting result will be like:

(Long parts are not nested on tube tails intentionally)
If Utilization Prior and Economical enabled, it will be like:

(Long parts are nested on the tube tails as possible as it can)
If Utilization Prior and Condition enabled, it will be like:

(Long parts are nested on tube tails intentionally, the condition is meet strictly but the utilization is not that satisfying.)
According to the comparison above, you can take them as reference and select proper strategy priority as needed.
As we can see in the picture above, you can also set a length range for Short Parts, and TubesT will nest the parts which meet the conditions at tube tails.
If you select Short Parts instead, TubesT will nest the parts with designated length at tube tails, and there will be another parameter named Tail Range. It will set a range for tube tail to define how short the tube tail should be, and once there are parts which are nested in this range, it will be considered as Condition Met.
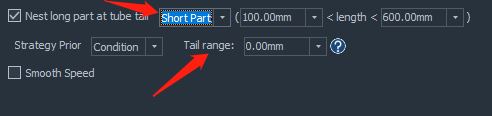
And here is a diagram to help you understand it.
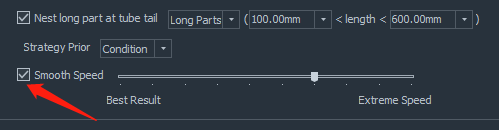
- Smooth Speed
As Best Nesting result can be realized with Extreme Speed simultaneously, so you’re allowed to adjust the proportion of these two points by dragging the icon on the bar.
Description
Auto Nest plays a dramatically important role in TubesT, there are many advanced functions and options in it so that TubesT can realize various nesting demands from different users, and next we’ll talk about it in detail.
The above is the whole interface of Auto Nest, and also the icon pointed by red arrow.
Parameters definition
- Parts Selection
As shown in the picture, there are two options under this setting, named Nest All Parts and Nest Selected Parts respectively. Just as what its name said, Auto Nest will be applied for all the parts or the ones selected.
You can select the parts by clicking the checkbox beside the parts here.
- Tube Length
Here you can input some basic information for the Tubes, on which you can nest the parts.
- Dead Zone
When the front chuck moves next to mid chuck, the distance from the tail( the nearest side of the front chuck to the cutting head) to cutting head is Dead Zone, called remnant length, which cannot be used during the working actually.
If a tube cutting machine with two chucks, and the front chuck moves to the extremity position as shown above, and there is a distance of 230mm which cannot be processed anymore, then the Dead Zone is 230.
If a tube cutting machine with three chucks, and it has Pull Tubes and Dodge functions to minimize the remnant to 0, then the Dead Zone is 0.
- Remnants
If there are some relative long remnant tubes which can be used to nest the parts again, you can click the checkbox as shown below, then TubesT will nest parts on the remnant tubes first.
- Front Margin
The distance between the first part and tube apex.
Part Gap: the minimum interval between the parts nested when Common Line is not applied.
Actual tube length used to nest the parts depends on Tube length, Dean Zone and Front Margin.
- Disable Y Rotate
If you enable this option, TubesT will not allow the parts to rotate around Y axis, the result is shown as below:
- Disable Z Rotate
If you enable this option, TubesT will not allow Z axis to rotate when nesting.
- Free Rotate(round)
If you’re nesting the parts on circular tubes, then the parts can be rotated freely to save more spaces when this option is enabled.
- Identical Match
It is a kind of Common Line types, used for the nesting of general parts, which means the cut-off lines of two adjacent parts are superimposed.
- Weld Kerf Offset
A kind of Common Line types, used for the parts with bevel cut-off section which are applied Weld Kerf process in TubesT.
- Island Type
If there are remnants between the cut-off lines of two adjacent parts, you can apply Island Type to generate the common lines.
- Nest Long Parts at Tube Tail
For the machines with Dodge and Pull Tubes to realize short or zero remnants, it is necessary to nest long parts at tube tail.
You’re allowed to set a specific length range for Long Parts, then TubesT will nest the parts same to or longer than that value at tube tails during Auto Nest.
Note: You must enable Utilization Prior first before setting length range for parts.
After setting the length range, it is necessary for you to select Strategy Prior, Condition and Economical respectively, in which the former means TubesT will meet the condition first and ignore the utilization, but the latter will put utilization in the first priority.
For example, there are some parts to be nested, now the condition is Nest Long Parts at Tube Tails.
If Utilization Prior enabled only, the nesting result will be like:
(Long parts are not nested on tube tails intentionally)
If Utilization Prior and Economical enabled, it will be like:
(Long parts are nested on the tube tails as possible as it can)
If Utilization Prior and Condition enabled, it will be like:
(Long parts are nested on tube tails intentionally, the condition is meet strictly but the utilization is not that satisfying.)
According to the comparison above, you can take them as reference and select proper strategy priority as needed.
As we can see in the picture above, you can also set a length range for Short Parts, and TubesT will nest the parts which meet the conditions at tube tails.
If you select Short Parts instead, TubesT will nest the parts with designated length at tube tails, and there will be another parameter named Tail Range. It will set a range for tube tail to define how short the tube tail should be, and once there are parts which are nested in this range, it will be considered as Condition Met.
And here is a diagram to help you understand it.
- Smooth Speed
As Best Nesting result can be realized with Extreme Speed simultaneously, so you’re allowed to adjust the proportion of these two points by dragging the icon on the bar.
-

Download
-

Contact us
-

Online consultation

