

-
Products
-
2D Cutting

-
Tube Cutting
-
3D Cutting
-
BLT Intelligent Cutting
-
Industrial Automation
-
Industrial Software
-
-
Portfolio
-
-
2D Cutting Head
Tube Cutting Head
Plane Bevel Cutting Head
Structural Steel Cutting Head
-
BOCHU High-Speed Servo Drive
-
Popular products
-
- Online Store
- Service & Support
- About BOCHU
- Investors Relations


- Software Download
- Manual
- Tutorial
- CloudNest
“Label” function
“Label” function: Add “label” information to the parts in CypNest software, and then cooperate with the InkJet system installed on the machine tool to print “labels” on the parts.
Instructions
Click Add Tag – Add Text Label.

“Add text label”
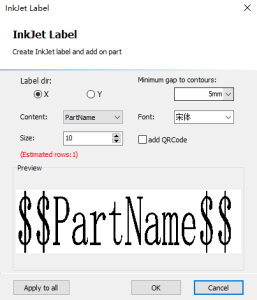
Parameters
Label direction: place the label along the X or Y direction

Text content: the content of the label, e.g. part name
Size: label size
Min gap to contours: label content avoids the distance of the inner hole of the part
Font: Label text font
Add QR code: After checking, the label content is “QR code + part name”, scan this QR code to display the part name

“Add tags”
Click Add Tag.

Left Column
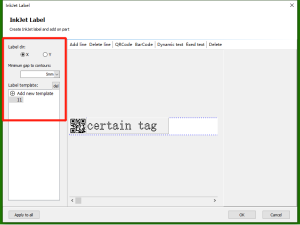
- Label direction: place labels along the X or Y direction
- Min gap to contours: the distance that the label content avoids the inner hole of the part
- Label template: you can add, delete, and name templates
Main
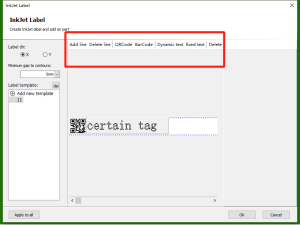
Add line: As shown in the figure below, the left side is the label effect, and the right side is the setting interface, a total of two lines. Click to add a row.
Delete line: select “one line” and click to delete the current line

Add QR code:
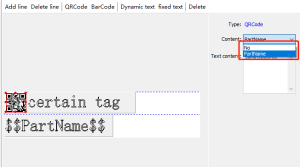
After adding the QR code, scan the QR code to display the content
- “None”: You can set the display content by yourself, and the content will be displayed after scanning the code
- “Part Name”: scan the code to display the part name
Add barcode:

After adding a barcode, scan the barcode to display the content. Text content: After setting, scan the code to display the content
Add dynamic text:
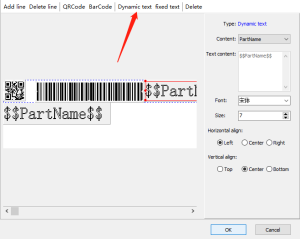
- Font: The font of the label content can be set
- Size: The size of the label content can be set
- Horizontal alignment: You can set the horizontal alignment of the label content
- Vertical alignment: You can set the vertical alignment of the label content
Add fixed text:

- Text content: After setting, the label is displayed as the set content
- Font: The font of the label content can be set
- Size: The size of the label content can be set
- Horizontal alignment: You can set the horizontal alignment of the label content
- Vertical alignment: You can set the vertical alignment of the label content
- Delete: delete the current line
Bottom

- Apply to all: Label the nesting results of all layouts
- OK: Add a label to the current layout layout result
- Cancel: Cancel the setting
“Label” function
“Label” function: Add “label” information to the parts in CypNest software, and then cooperate with the InkJet system installed on the machine tool to print “labels” on the parts.
Instructions
Click Add Tag – Add Text Label.
“Add text label”
Parameters
Label direction: place the label along the X or Y direction
Text content: the content of the label, e.g. part name
Size: label size
Min gap to contours: label content avoids the distance of the inner hole of the part
Font: Label text font
Add QR code: After checking, the label content is “QR code + part name”, scan this QR code to display the part name
“Add tags”
Click Add Tag.
Left Column
- Label direction: place labels along the X or Y direction
- Min gap to contours: the distance that the label content avoids the inner hole of the part
- Label template: you can add, delete, and name templates
Main
Add line: As shown in the figure below, the left side is the label effect, and the right side is the setting interface, a total of two lines. Click to add a row.
Delete line: select “one line” and click to delete the current line
Add QR code:
After adding the QR code, scan the QR code to display the content
- “None”: You can set the display content by yourself, and the content will be displayed after scanning the code
- “Part Name”: scan the code to display the part name
Add barcode:
After adding a barcode, scan the barcode to display the content. Text content: After setting, scan the code to display the content
Add dynamic text:
- Font: The font of the label content can be set
- Size: The size of the label content can be set
- Horizontal alignment: You can set the horizontal alignment of the label content
- Vertical alignment: You can set the vertical alignment of the label content
Add fixed text:
- Text content: After setting, the label is displayed as the set content
- Font: The font of the label content can be set
- Size: The size of the label content can be set
- Horizontal alignment: You can set the horizontal alignment of the label content
- Vertical alignment: You can set the vertical alignment of the label content
- Delete: delete the current line
Bottom
- Apply to all: Label the nesting results of all layouts
- OK: Add a label to the current layout layout result
- Cancel: Cancel the setting
-

Download
-

Contact us
-

Online consultation

