

-
Products
-
2D Cutting

-
Tube Cutting
-
3D Cutting
-
BLT Intelligent Cutting
-
Industrial Automation
-
Industrial Software
-
-
Portfolio
-
-
2D Cutting Head
Tube Cutting Head
Plane Bevel Cutting Head
Structural Steel Cutting Head
-
BOCHU High-Speed Servo Drive
-
Popular products
-
- Online Store
- Service & Support
- About BOCHU
- Investors Relations


- Software Download
- Manual
- Tutorial
- CloudNest
Import or create parts in CypNest, identify text tags on parts, correct drawing error and map CAD layers to laser production layers.
Video Tutorial
Operation Guide
1.Import part entrance: to import or create parts from different entrance.
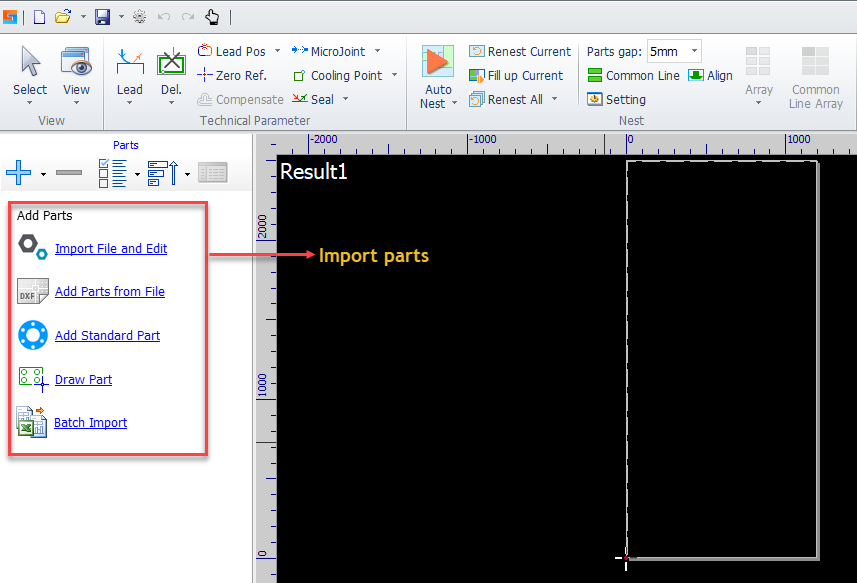
- Import File and Edit
This is recommended entrance to import parts file for beginners, invalid parts drawing has to be corrected before imported into parts library.
- Add Parts from File
Import parts drawing directly to parts library. Do notice that parts drawing cannot be
- Add Standard Part
Create parts from standard shapes.
- Draw Part
Draw a part via integrated CAD tools.
- Batch Import
Import parts file by excel table. The excel template is under C:\Program Files (x86)\Friendess\CypNest\BatchImport.
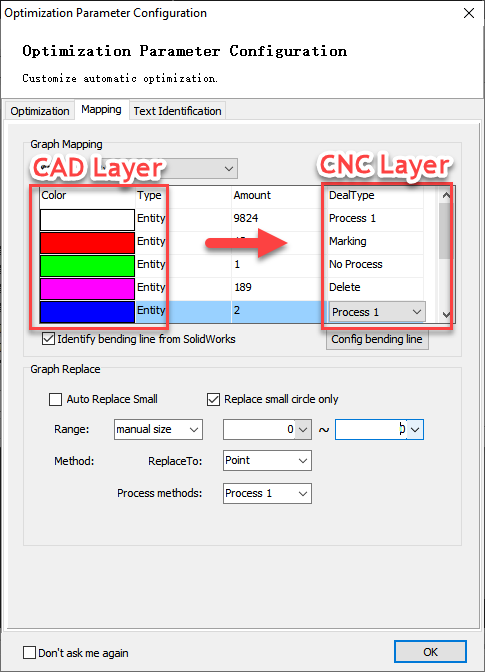
2. Layer Mapping: to differentiate CAD layers to marking, cutting, or non-process layers for CNC production via ‘Optimization Config’ window.
3. Text Identification: to recognize text tags in CAD drawing for automatic parts naming and quantity setup in CypNest.

4.Import Part editor. Through ‘Import file and edit’ will open an editor window to modify drawing error which all be red marked and labeled with error
description.

- Valid part: the drawing with no deficiency will identified as valid part.
- Invalid part: the drawing with deficiency like open contour and crossed lines will be red marked
- Error description: explain which type the error is that help to correct the error with suited tools.
- ReGroup: after correct the error, click
 to refresh the drawing for program to identify the modified drawing to valid part. click
  to deliberately set drawing with deficiency to valid part.
 - Merge: merge different parts of same geometry to same type in part list.
Notice: unfinished drawing in Import Part editor can be saved as *.cpe file to resume editing. The invalid part cannot be import to parts library.
Next Article:
Import or create parts in CypNest, identify text tags on parts, correct drawing error and map CAD layers to laser production layers.
Video Tutorial
Operation Guide
1.Import part entrance: to import or create parts from different entrance.
- Import File and Edit
This is recommended entrance to import parts file for beginners, invalid parts drawing has to be corrected before imported into parts library.
- Add Parts from File
Import parts drawing directly to parts library. Do notice that parts drawing cannot be
- Add Standard Part
Create parts from standard shapes.
- Draw Part
Draw a part via integrated CAD tools.
- Batch Import
Import parts file by excel table. The excel template is under C:\Program Files (x86)\Friendess\CypNest\BatchImport.
2. Layer Mapping: to differentiate CAD layers to marking, cutting, or non-process layers for CNC production via ‘Optimization Config’ window.
3. Text Identification: to recognize text tags in CAD drawing for automatic parts naming and quantity setup in CypNest.
4.Import Part editor. Through ‘Import file and edit’ will open an editor window to modify drawing error which all be red marked and labeled with error
description.
- Valid part: the drawing with no deficiency will identified as valid part.
- Invalid part: the drawing with deficiency like open contour and crossed lines will be red marked
- Error description: explain which type the error is that help to correct the error with suited tools.
- ReGroup: after correct the error, click to refresh the drawing for program to identify the modified drawing to valid part. click to deliberately set drawing with deficiency to valid part.
- Merge: merge different parts of same geometry to same type in part list.
Notice: unfinished drawing in Import Part editor can be saved as *.cpe file to resume editing. The invalid part cannot be import to parts library.
Next Article:
-

Download
-

Contact us
-

Online consultation

